Friday, December 2, 2016

Entity Framework Code First with Repository Pattern

Problem: Need to develop a back-end (Data Layer and Business Logic Layer) of a data-driven application with less effort. Both layers must be able to unit test.

Solution: Implement data model using Entity Framework with code first approach and implement Data access layer using generic repository pattern. On top of that, implement a unit of work pattern to create an abstraction layer in between the data access layer and the business logic layer.

Sample Code : 
Two class library-type projects have been added to the solution, One project contains the entity classes and the other project contains the model (Project reference has been added from the Entity project to the Model project). A code-first entity model is added to the model project and code-first entity classes are created in the entity project.

Ex: Sample code first entity class
using System.ComponentModel.DataAnnotations.Schema;
namespace MyDevTalks.Entities
{
    [Table("Customers")]
        public class Customer 
    {
        public Guid Id { get; set; }
      public string Name { get; set; }
    }
}

Sample Model class :
namespace MyDevTalks.Model
{
    using MyDevTalks.Entities;
    using System.Data.Entity;
    public class Context : DbContext
    {
        public Context() : base("name=DataModel")
        {
        }
        public virtual DbSet<Customer> Customers { get; set; }
    }
}

A generic interface class IGenericRepository<T> containing the CRUD operations that are common to all the entities in the model is added to the Model project.
using System;
using System.Linq;
using System.Linq.Expressions;
namespace MyDevTalks.Model
{
    public interface IGenericRepository<T> where T : class
    {
        IQueryable<T> GetAll();
        IQueryable<T> FindBy(Expression<Func<T, bool>> predicate);
        void Add(T entity);
        void Delete(T entity);
        void Edit(T entity);
        void Save();
    }
}

Then IGenericRepository<T> interface is implemented in a generic abstract class,
using System;
using System.Data.Entity;
using System.Linq;
using System.Linq.Expressions;
namespace MyDevTalks.Model
{
    public abstract class GenericRepository<C, T> : 
         IGenericRepository<T> where T : class where C : DbContext, new()
    {
        private C entities = new C();
        public C Context
        {
            get { return entities; }
            set { entities = value; }
        }
        public virtual IQueryable<T> GetAll()
        {
            IQueryable<T> query = entities.Set<T>();
            return query;
        }
        public IQueryable<T> FindBy(Expression<Func<T, bool>> predicate)
        {
            IQueryable<T> query = entities.Set<T>().Where(predicate);
            return query;
        }
        public virtual void Add(T entity)
        {
            entities.Set<T>().Add(entity);
        }
        public virtual void Delete(T entity)
        {
            entities.Entry(entity).State = EntityState.Deleted;
            entities.Set<T>().Remove(entity);
        }
        public virtual void Edit(T entity)
        {
            entities.Entry(entity).State = EntityState.Modified;
        }
        public virtual void Save()
        {
            entities.SaveChanges();
        }
    }
}

Then, made some concrete repository classes implementing the abstract GenericRepository.
using MyDevTalks.Entities;
namespace MyDevTalks.Model.Repositories
{
    public class CustomerRepository : GenericRepository<Context, Customer>
    {
        public void Foo(Guid Id){}
    }
}

Now I'm able to do all the CRUD operations + any concrete implementation.

[TestMethod]
public void SomeTestMethod()
{
   // Dependancy inject CustomerRepository and ItemRepository
   Context myDbContext = new Context();
   CustomerRepository _customerRepository= new CustomerRepository(myDbContext);
   var cust = new Customer() { Id = Guid.NewGuid(), Name = "My Customer" };

   _customerRepository.Add(cust);
   _customerRepository.Foo();
   _customerRepository.Save();
//Some Other Repo
   SomeOtherRepository _otherRepository = new SomeOtherRepository (myDbContext);
   _otherRepository .Foo(cust.Id);
_otherRepository .Save();
}

So the problem arises here when you have several repository classes, all of them will maintain their own instance of the Context class, which could result in data inconsistency, So usually the context object parsing is implemented at the Unit of Work classes, but it's better to make the default constructor of the Concrete Repository classes to private and implement an overloaded constructor, which accepts the Context. Also, Save() method has been removed from both IGenericRepository interface and GenericRepository abstract class.

using MyDevTalks.Entities;
namespace MyDevTalks.Model.Repositories
{
    public class CustomerRepository : GenericRepository<Context, Customer>
    {
        private CustomerRepository() { }
        public CustomerRepository(Context model)
        {
           base.Context = model;
        }
        public void Foo() { }
    }
}

Accordingly, my test method should be altered as below. So the context is shared in between the repositories used in a single unit, in other words, a Unit of Work. 

[TestMethod]
public void SomeTestMethod()
{
  Context myDbContext = new Context();
  CustomerRepository custRep = new CustomerRepository(myDbContext);
  custRep.Add(new Entities.Customer() { Id = Guid.NewGuid(), Name = "My Customer" });
  custRep.Foo();
  //Some Other Repo
  SomeOtherRepository othrtRepo = new SomeOtherRepository (myDbContext);
  othrtRepo.Foo(custRep.Id);
  myDbContext.SaveChanges();
}


Tuesday, November 29, 2016

How to apply client side endpoint configuration as an extra Parameter in SANA admin panel?

Sana provides a mechanism to specify the WCF client-side endpoint configuration as an extra parameter, if you need to override the default configuration.


You can only specify either the web service URL or Extra Parameters. For this case, remove the web service URL and put the below parameter as an Extra Parameter.

endpointconfigurationname=X

Then define custom client-side configurations within the <system.servicemodel> section of the web.config file of the Sana web store application.


Thursday, October 27, 2016

Which Loop Runs Faster in NET?

Problem: Which Looping structure runs faster?

Selected Looping Structures :

  • While Loop
  • Do-While Loop
  • For Loop
  • Lamda For-Each Loop
  • Parallel For Loop
  • Parallel For-Each Loop

    Test Code : (Console Application)

    Main Method :
    static void Main(string[] args)
    {
     int[] someData = new int[] {465,545,674,354 };
       Stopwatch timer = new Stopwatch();
       timer.Start();
       ProcessUsingWhileLoop(someData);
       timer.Stop();
       Console.WriteLine("Process Using While Loop :" + timer.ElapsedMilliseconds);
       timer.Reset();
       timer.Start();
       ProcessUsingDoWhileLoop(someData);
       timer.Stop();
       Console.WriteLine("Process Using Do-While Loop :" + timer.ElapsedMilliseconds);
       timer.Reset();
       timer.Start();
       ProcessUsingForLoop(someData);
       timer.Stop();
       Console.WriteLine("Process Using For Loop :"+timer.ElapsedMilliseconds);
       timer.Reset();
       timer.Start();
       ProcessUsingLamdaForEachLoop(someData);
       timer.Stop();
       Console.WriteLine("Process Using Lamda ForEach Loop :" + timer.ElapsedMilliseconds);
       timer.Reset();
       timer.Start();
       ProcessUsingParallelForLoop(someData);
       timer.Stop();
       Console.WriteLine("Process Using Parallel For Loop :" + timer.ElapsedMilliseconds);
       timer.Reset();
       timer.Start();
       ProcessUsingParallelForEachLoop(someData);
       timer.Stop();
       Console.WriteLine("Process Using Parallel ForEach Loop :" + timer.ElapsedMilliseconds);
       timer.Reset();
       Console.ReadLine();
     }

    ProcessUsingWhileLoop Method :
    static void ProcessUsingWhileLoop(int[] data)
    {
        int n = 0;
        while ( n < data.Length)
        {
            System.Threading.Thread.Sleep(data[n]);
            n++;
        }
    }
    

    ProcessUsingDoWhileLoop Method :
    static void ProcessUsingDoWhileLoop(int[] data)
    {
        int n = 0;
        do
        {
            System.Threading.Thread.Sleep(data[n]);
            n++;
        }
        while (n < data.Length);
    }
    

    ProcessUsingForLoop Method :
    static void ProcessUsingForLoop(int[] data)
    {
        for (int n = 0; n < data.Length; n++ )
        {
            System.Threading.Thread.Sleep(data[n]);
        }
    }
    

    ProcessUsingLamdaForEachLoop Method :
    static void ProcessUsingLamdaForEachLoop(int[] data)
    {
       data.ToList().ForEach(
            n => System.Threading.Thread.Sleep(n));
    }
    

    ProcessUsingParallelForLoop Method :
    static void ProcessUsingLamdaForEachLoop(int[] data)
    {
       Parallel.For(0, data.Length,
            n => 
            {
                System.Threading.Thread.Sleep(data[n]);
            });
    }
    

    ProcessUsingParallelForEachLoop Method :
    static void ProcessUsingParallelForEachLoop(int[] data)
    {
        Parallel.ForEach(data, 
             n =>
             {
                System.Threading.Thread.Sleep(data[n]);
             });
    }


    Results :
    (built-in Debug Mode and run from Visual Studio)

    Process Using While Loop: 2039
    Process Using Do-While Loop: 2041
    Process Using For Loop: 2064
    Process Using Lamda ForEach Loop: 2074
    Process Using Parallel For Loop: 984
    Process Using Parallel ForEach Loop: 870

    (built-in Release Mode ran from executable)
    Process Using While Loop: 2046
    Process Using Do-While Loop: 2040
    Process Using For Loop: 2039
    Process Using Lamda ForEach Loop: 2046
    Process Using Parallel For Loop: 838
    Process Using Parallel ForEach Loop: 837


    Conclusion :
    Based on the data collected, below is the list of the fastest looping structure to a slower one.
    1. Parallel ForEach Loop
    2. Parallel For Loop
    3. For Loop
    4. While Loop
    5. Do-While Loop
    6. Lamda ForEach

    Wednesday, October 26, 2016

    SAP Business One : Add more Demo DBs of Different Countries

    Problem: How to Add more Demo DBs of Different Countries for testing purposes?

    Solution: Need to install additional databases from the SAP Business One Server setup manually.

    Steps :
    1. Locate the Setup file in your SAP Business One installation folder.

    2. Select Modify, as you have already install at least one or more demo databases.

     3. Select the Country you want.

     4. Select the database server type.

    5. Provide database credentials to create the database.

    Wednesday, October 12, 2016

    NET Enterprise Services : COM, DCOM and COM+ Services


    It All begins with COM :

    Microsoft COM (Component Object Model) technology in the Microsoft Windows family of Operating Systems enables software components to communicate. COM is used by developers to create reusable software components, link components together to build applications, and take advantage of Windows services. COM objects can be created with a variety of programming languages. Object-oriented languages, such as C++, provide programming mechanisms that simplify the implementation of COM objects. The family of COM technologies includes COM+, Distributed COM (DCOM) and ActiveX® Controls.


    So What is COM+?

    COM+ is the name of the COM-based services and technologies first released in Windows 2000. COM+ brought together the technology of COM components and the application host of Microsoft Transaction Server (MTS). COM+ automatically handles programming tasks such as resource pooling, disconnected applications, event publication, and subscription and distributed transactions.


    COM+ and DCOM

    In order for Microsoft to provide developers with support for distributed transactions, resource pooling, disconnected applications, event publication and subscription, better memory and processor (thread) management, as well as to position Windows as an alternative to other enterprise-level operating systems, Microsoft introduced a technology called Microsoft Transaction Server (MTS) on Windows NT 4. With Windows 2000, that significant extension to COM was incorporated into the operating system (as opposed to the series of external tools provided by MTS) and renamed COM+.

    At the same time, Microsoft de-emphasized DCOM as a separate entity. Components that made use of COM+ services were handled more directly by the added layer of COM+, in particular by operating system support for interception. In the first release of MTS, the interception was tacked on - installing an MTS component would modify the Windows Registry to call the MTS software, and not the component directly. Windows 2000 also revised the Component Services control panel application used to configure COM+ components.


    Tuesday, August 2, 2016

    -8006 : Resource error in SAP Business One

    Suddenly I received with (-8006) from the DI API. This was my request sent and the response received.

    Request :
     1
     2
     3
     4
     5
     6
     7
     8
     9
    10
    11
    12
    13
    14
    15
    16
    <?xml version=\"1.0\" encoding=\"UTF-16\"?>
    <env:Envelope xmlns:env=\"http://schemas.xmlsoap.org/soap/envelope/\">
      <env:Body>
        <dis:Login xmlns:dis=\"http://www.sap.com/SBO/DIS\">
          <DatabaseServer>xxxx</DatabaseServer>
          <DatabaseName>SBODEMOUS</DatabaseName>
          <DatabaseType>dst_MSSQL2012</DatabaseType>
          <DatabaseUsername>xx</DatabaseUsername>
          <DatabasePassword>xxxxxxx</DatabasePassword>
          <CompanyUsername>manager</CompanyUsername>
          <CompanyPassword>manager</CompanyPassword>
          <Language>ln_English</Language>
          <LicenseServer>xxxxx</LicenseServer>
        </dis:Login>
      </env:Body>
    </env:Envelope>
    

    Response :
     1
     2
     3
     4
     5
     6
     7
     8
     9
    10
    11
    12
    13
    14
    15
    16
    17
    18
    19
      <?xml version="1.0" ?> 
     <env:Envelope xmlns:env="http://www.w3.org/2003/05/soap-envelope">
     <env:Body>
     <env:Fault>
     <env:Code>
      <env:Value>env:Receiver</env:Value> 
     <env:Subcode>
      <env:Value>-8006</env:Value> 
      </env:Subcode>
      </env:Code>
     <env:Reason>
      <env:Text xml:lang="en">Resource error</env:Text> 
      </env:Reason>
     <env:Detail>
      <Command>Login</Command> 
      </env:Detail>
      </env:Fault>
      </env:Body>
      </env:Envelope>
    

    When I look for a solution in SAP community, Many experts have advised to remove the  SM_OBS_DLL folder from the temporary folder, stop the SBO DI Server from SAP Business One Service Manager and then reinstall the DI API. 

    I did the first step of removing the SM_OBS_DLL  folder from my %temp% path. Then I restarted my workstation and checked whether all my services are running normally or not. Especially the SQL server instance. The real reason was my SQL server service had not been started with the startup. So the DI server cannot access the database.

    So I prepared a batch file to start/stop the SQL and SAP-related services, which might also rescue you in such situations.

    Stop Services.bat : 
    net stop MSSQLSERVER
    net stop TAO_NT_Naming_Service
    net stop SLD
    net stop B1LicenseService
    net stop SBODI_Server
    net stop SBOWFDataAccess
    net stop SBOWorkflowEngine
    @PAUSE


    Start Services.bat :
    net start MSSQLSERVER
    net start TAO_NT_Naming_Service
    net start SLD
    net start B1LicenseService
    net start SBODI_Server
    net start SBOWFDataAccess
    net start SBOWorkflowEngine
    @PAUSE

    Monday, August 1, 2016

    Install SAP Business One License

    To generate a licence file for SAP Business one, you are required to submit the below details.

    - SAP Business One version and the Patch Level
    If you are not sure about what SAP Business One version level you have installed or updated patch level, Go to About -> About SAP Business One.

    If your license is expired, you will not be able to access any of the screens.

    - Hardware key
    You can retrieve it from SAP Business One Service Manager as below.


    Click on Settings :

    When you got the valid license use the General Settings of the License Manager (above the window) to apply the license key. Browse the license file and click on "Import License File".


    Then open up SAP Business One with the Manager user (or using an account that has user management privileges) and go to Administration > Licence Administration. Select the user account that you need to assign permissions to (in my case it was 'Manager') and select the required license type to apply for the licence.


    Click on Update to finish the process.


    Wednesday, July 20, 2016

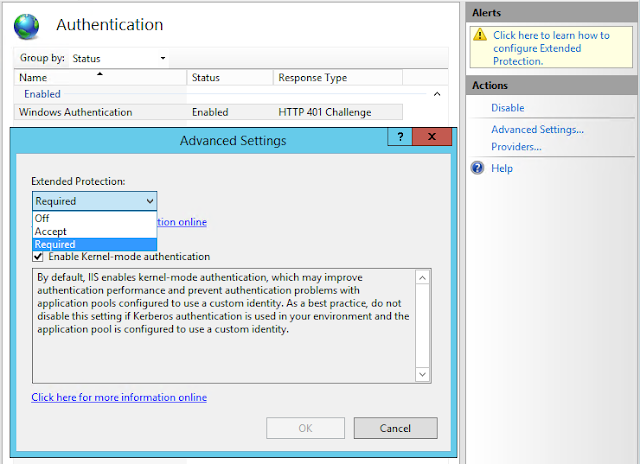
    WCF Error The ExtendedProtectionPolicy.PolicyEnforcement values do not match

    Error Message :
    ==============

    The extended protection settings configured on IIS do not match the settings configured on the transport.  The ExtendedProtectionPolicy.PolicyEnforcement values do not match.  IIS has a value of Never while the WCF Transport has a value of Always. 


    Binding Configuration Used:

    <bindings>
      <netTcpBinding>
         <binding name="mynet" sendTimeout="00:00:05" portSharingEnabled="true">
           <security mode="None" />
         </binding>
      </netTcpBinding><basicHttpBinding>
         <binding name="myBinding" maxReceivedMessageSize="2147483647">        
           <security mode="TransportCredentialOnly">
             <transport clientCredentialType="Windows">
               <extendedProtectionPolicy policyEnforcement="Always"/>
             </transport>
           </security>
         </binding>
      </basicHttpBinding>
    </bindings>

    Solution : Set site policy enforcement :
    ===============================

    1. Go to IIS and then to your hosted service listed under Sites.
    2. Then go to "Authentication" in the IIS  section group.


    3. Enable Windows Authentication.

    4. Select Windows Authentication and click on Advanced Settings from Action panel.


    5. Then set the extended protection to "Required" and click OK.
    6. Now recheck the service URL.

    Tuesday, July 19, 2016

    Remote Debugging a WCF Service

    I've recently needed to remotely debug a WCF service hosted in a Test (QA) environment, as the described issue was not reproducible in my local workstation. After having read the MSDN, and referring to some Youtube materials, I could configure the remote debugging tools.

    First, you need to download the matching remote debugging tools set to your Visual Studio version.

    Latest version for VS 2015 : Remote Tools for Visual Studio 2015 Update 3
    Latest version for VS 2013 : Remote Tools for Microsoft Visual Studio 2013 Update 4

    You have to download and install the matching bit version (x86/x64) package on the remote server where your service is hosted (not in the PC where the source code and Visual Studio is installed) . When the setup is completed, you might be asked to restart the server. 


    You will get this icon into your desktop.


    Then run this with Administrative privileges (Run As Administrator).


    Now go to Tools => Options Set the Authentication mode to "No Authentication" and check the "Allow any user to debug". and click on OK. 


    If your port 4018 is blocked, you have to open the port from the Windows firewall. Before switching back to the workstation pc, you have to copy the pdb files which match the application build version currently running in the remote server. If you have control of the remote server, my advice is to rebuild your application in debug mode and copy the build assemblies along with the pdb files into the remote server. If you do so, you will have more information and control while you are debugging the code.

    Now switch back to your workstation PC where you have the Visual Studio and the source code.
    Open up your project (if you haven't) Go to Visual Studio options and uncheck Enable Just My Code option.


    If you need to debug the referenced libraries, you can configure the Symbols and cache them to a local folder to speed up your next debugging session.


    Now go to Debug > Attach to Process 


    Then select "Remote" from Transport drop down, and click on "Find..."


    Your remote server details will be shown if your remote server is on the same subnet as your workstation. If your remote server is outside your subnet you have to type the full hostname along with the remote debugging port (Ex: MyRemoteServer.mydomain.com:4018) and you have to make sure the firewall on this server allows TCP traffic to the specific port.

    When you select the remote host, you will get the list of running processes on the remote server. Make sure you have clicked "Show processes from all users".


    Select w3wp.exe process and click on Attach. If multiple instances of the w3wp process are shown, you can pick the correct one by referring to the username column. if it is not shown, you have to access the service URL from your browser/WCF test client or directly from the remote server IIS to activate the service. 

    Now you can place your breakpoint on your code and run your application. You will be able to debug line by line with variable values. (Note: Variable values might not appear if you haven't copied the pdb files into your server location or pointed at the Symbol file (.pdb) location).


    Monday, February 29, 2016

    Set Always run as Admin permanently for any Program

    In any Microsoft Windows version (including XP and Later), you have to right-click on the executable file (exe) and select "Troubleshoot compatibility".
    1. Select "Troubleshoot program"
    2. check "The program requires additional permissions"
    3. Click "Next", click "Test the program..."
    4. Wait for the program to launch
    5. click "Next"
    6. select "Yes, save these settings for this program"
    7. click "Close"
    After doing this, No matter how many shortcuts you create for your program, those will be executed with Admin privileges if your current login has administrator privileges for your local environment, if not you will be prompted to enter the admin credentials. 

    Wednesday, February 24, 2016

    Configure WCF for IIS on Windows 8

    I have encountered with this issue when I was trying to deploy a WCF service on a fresh Windows 8.1 machine.


    My next action was to try registering ASP.Net applications for IIS using ASP.Net IIS Registration tool (aspnet_regiis -i) as all the IIS default components have been already installed and functioning.

    I've installed the below options in .Net Framework 4.5 Advanced Services from the Windows Features (as described in this msdn blog) and my WCF service got up and running.


    If you are a console lover, you can use these commands in command prompt to enable the HTTP Activation.

    C:\> DISM /Online /Enable-Feature /FeatureName:WCF-HTTP-Activation
    C:\> DISM /Online /Enable-Feature /FeatureName:WCF-HTTP-Activation45

    Monday, February 22, 2016

    First SAP Business One Add-On Project on Visual Studio 2013 using SAPBusinessOneSDK

    In this post, I'm going to explain how I created my first SAP Business One Add-On Project using Visual Studio 2013.

    Before progressing ahead you must verify the prerequisites mentioned in this SAP Community Page.

    After you have installed the SAP Business One studio, make a search in the start menu.


    - SAP Business One Studio (32-bit), is the SAP in-build IDE provided for Add-on development.


    - SAP Business One Studio for Microsoft Visual Studio 2013 opens up the visual studio 2013


    If you want to create the add-on from a Package generated by the "SAP Business One Studio" go ahead with the "SAP Business One Add-On Project From B1s File" project type and Visual Studio will prompt you to browse your 'b1s' file.

    Select "SAP Business One Add-On Project", and you will get an SAP Business One to look and feel form as below.


    When you start debugging the project you will be hit with the below exception.


    The reason was I haven't opened up the SAP Business One Client (32-bit) before starting the debugging process.

    I have updated the Title property of Form1 as "Hello Sap B1" and pressed F5.


    1- My add-on is listed under the Modules of the Main Menu.
    2- Form1 will be visible when you click on Hello_SAP_B1.
    3-When Form1 is clicked, you could see your form inside the SAP Business One.

    Then open the Menu.cs file, according to my understanding the code in this file controls how the add-on is shown in the SAP Business One Client.

    I've done a few changes in the Menu.cs file with the intention of observing how it behaves.

    I've changed the name of the package (removed underscore signs), added an extra code block to check and remove if my add-on it is listed in the Main Menu, and changed the display name of my form.


    I've got the exact result that I wanted. Then I renamed Form1.b1f in the solution as "HelloB1.b1f" and set the same value for Unique ID. (Note::this change is indicated in the Menu.cs file code change by a red arrow).

    oCreationPackage.UniqueID = "Hello_SAP_B1.HelloB1";

    If you debug the project at this stage your form will be listed in the main menu but will not be popped out. Luckily I could find out what was the reason by observing the HelloB1.b1f.cs file.


    Even I have renamed the Form from Solution Explorer, which has not renamed the name of the behind class and certain annotation properties. So I've altered "Form1" with "HelloB1", as a result, you even will get two compilation issues in SBO_Application_MenuEvent of Menu.cs class.

    After doing the below amendments, I could see my form inside the SAP Business One.


    These are the first few experiences that I had with the SAP Business One add-on development, and I believe this post will be informative for all the people who start it for the first time.

    I'm pretty sure these PDFs will save a few days of your life.

    How to Guide SAP Business One 9.0

    SAP Business One – SoftwareDevelopment Kit (SDK)

    Web site of  Mepa-Data AG

    Sunday, February 21, 2016

    SANA Configuration issue with SAP Business One during the initial SANA setup

    I've recently come across with below error in SANA admin.

    Retrieving the COM class factory for component with CLSID
    {F3D77DAE-6C14-426E-B56F-C550BDE8B09D} failed due to the following error:
     80070005 Access is denied. (Exception from HRESULT: 0x80070005 (E_ACCESSDENIED)).


    In my setup, Both Sana and SAP Business One (Test) were deployed in my local PC. After trying out several ways, finally got the correct response from Sap Community Network.

    If the SAP Business One installation and SANA installation are on two nodes, you have to apply the below to the node where SAP Business One is installed.


    1. Click Start --> Run
    2. Enter DCOMCNFG and press OK. This will open the DCOMCNFG window.
    3. Browse down the tree to Console Root -> Component Services -> Computers -> My Computer
    4. Right-click on "My Computer" and select properties


    5. Select the "Default Properties" tab set below :
      a. Enable Distributed COM on this computer - option is checked
      b. Default Authentication Level - Set to Connect
      c. Default Impersonation Level - Set to Identify


    6. Select the "COM Security" tab
    7. Click on Access Permissions ' Edit Default
         a. Add : "Anonymous", "Everyone", "Interactive", "Network", "System" with Local and Remote access permissions set.

    8. Click on Launch and Activation Permissions ' Edit Default
        a. Add "Anonymous", "Everyone", "Interactive", "Network", "System" with Local and Remote access permissions set.
    9. Click on OK
    10. Close the DCOMCNFG window