Sunday, October 6, 2013

Type Sharing Issue with Multiple WCF Service References

I've encountered with a strange issue where the WCF test client could not generate the WSDL for the WCF service. No solutions have been available when googling with the error message we've got. So I split the service contract into three separate services depending on their functionality of them with the intention of adding them as 3 separate service references.

Then I've added the 3 service references to the front-end projects with the type-sharing option. But still had to re-factor a considerable number of lines of codes as the previous service client splits into 3 now. I've opened the files (except the xsds) generated by the service reference, then found this interesting behaviour in a file called "Reference.svcmap"


I've listed all my other mex endpoints as below and incremented the souceId, then I've regenerated the service reference.


Bingo..... Now using the ServiceAClient object I could invoke all the service methods available in ServiceB, ServiceC and ServiceD.

Wednesday, August 21, 2013

Fix : The "FindRibbons" task could not be loaded VSTO


I've recently encountered with an error in a VSTO development (an Excel Add-in) under Vs 2010 environment.   The error message I got when compiling the solution is as follows.

"The "FindRibbons" task could not be loaded from the assembly, Microsoft.VisualStudio.Tools.Office.BuildTasks, Version=10.0.0.0, Culture=neutral, PublicKeyToken=b03f5f7f11d50a3a. Confirm that the <UsingTask> declaration is correct, that the assembly and all its dependencies are available, and that the task contains a public class that implements Microsoft.Build.Framework.ITask"

I have installed the VS 2012 together with VS2010 recently and I did the following process to get this resolved.

1. Open "Microsoft.VisualStudio.Tools.Office.targets" File from below Location
C:\Program Files (x86)\MSBuild\Microsoft\VisualStudio\v10.0\OfficeTools
2.  Press Ctrl+H and replace all 10.0.0.0 text with 11.0.0.0
3. Save the file to the desktop with the same & extension.
4. Delete the original file
5. Cut and paste the saved file to the above location.
6. Close and restart VS 2010 (If Opened)

Saturday, April 13, 2013

WCF (Windows Communication Foundation) First Step

Prerequisite : Microsoft Visual Studio 2010 (.net 4.0)

The purpose of this WCF article is to give a basic idea about how to create a simple WCF service.


To begin this tutorial, First, open up Visual Studio 2010 and create an empty Visual Studio solution. In My case, "WCF All in One Place".

Then add a WCF Service Library Project as Follows.


Now, There should be 3 files appear in the WCFServiceLibray project. The basic purpose of those files is as follows.
- Service.cs : Contains the service implement ion code
- IService.cs : Contains the service contract/ Service Interface class
- App.config : Contains the service configurations


You should be able to build and run the solution. If you do, the WCF Test Client should automatically host your WCF service and show what are the methods in your service and will give you a chance to play with those methods. If you have noticed your service metadata is exposed via the following mex end point.

 "http://localhost:8732/Design_Time_Addresses/WcfServiceLibrary/Service1/mex


"The metadata that the mex endpoint exposes describes the service, the various operations it has, parameters the operations require, and the return types. In other words, the metadata exposes the contract. With this information, the client can create a proxy to interact with the service. Clients use the mex endpoint to access the metadata."

Let's customize the project as we need. I suggest you to detached (decouple) the Service from its service contact, since I'm going to deploy this solution in several ways.


So first add another class library project to the solution called "ServiceContract" and delete the automatically create class1.cs.


Then add a new Interface class called "IServiceContratc.cs" to the ServiceContract project and place the following code inside the interface class.


Then delete the IService1.cs and Service1.cs classes from the WcfServiceLibrary project and add a new class called SampleService.cs to the same project and place the following code.

 
 Change the following attributes in the app.config file located in the WcfServiceLibrary project as follows.

- service name="WcfServiceLibrary.SampleService"
- baseAddress = "http://localhost:8732/WcfServiceLibrary/SampleService/"
- contract="ServiceContract.IServiceContract"


Debug the WcfServiceLibrary project, and the WCF Test Client window should list your new methods. Click on the .. method and enter the two values for the required two parameters.


and click on the invoke button. A pop-up dialogue box may appear and click OK after clicking on the tick (Don't show this....).  Then observe the Response.

Click on the XML tab located in the bottom center of the window and observe the request message sent by the WCF Test Client.


Password is in the plain sight !!. This is why you are required to think of securing your WCF services. 

Thursday, March 28, 2013

Do the Right Thing in Behind the Splash Screen

Prerequisite : Microsoft Visual Studio, Microsoft SQL Server (Any version)

I have seen many novice developers/students using a splash screen in their applications to give a good impression to the user. They usually place a timer and inside the timer tick event update the progress bar value and the text of a label. When the cap value reached 100 they close the splash screen and prompt the Login screen (if you have). 

The real purpose of the Splash screen is clearly described in this Wikipedia article. 

This is how I've done it differently for a 3-layer application, where the presentation layer and the business logic layer are connected through a web/WCF service. If you are unfamiliar with the web services or WCF, consider the serviceClient class as a regular class that calls some functions in the business logic layer.

Steps :
1. Add a new Windows Form (Splash.cs) to the project.
2. Set the following Properties of the Splash screen to the given values.
    -   ControlBox : false
    -   FormBoarderStyle : none
    -   ShowIcon : false
    -   ShowInTaskBar : false
    -   StartPosition : CenterScreen
    -   Size : 450,250 (Change according to the size of your image, If you have prepared any)

   If you provide a background image, set these values
    -   BackroundImage : brows and set your image
    -   BackgroundImageLayout : Zoom
    -   Transparency Key : set the colour that should be displayed as transparent.
3. Place some labels add a progress bar to the Splash form, and give whatever text is appropriate.
    Set the label BackColor to transparent, otherwise, labels will be displayed with a gray colour.


 4. Define a boolean variable inside the Splash.cs as follows. 
 public bool IsValidationCompleted  
 {  
     get;  
     private set;  
 } 

 5. Now set splash screen as the first screen by placing the following code in the Program.cs file.
 Application.EnableVisualStyles();  
   Application.SetCompatibleTextRenderingDefault(false);  
      //---- Added Code ----------------  
   Splash splash = new Splash();  
   Application.Run(splash);  

6. Clear the text of the status message and initialize IsValidationCompleted to false inside the Splash screen window constructor,
  public Splash()  
  {  
     InitializeComponent();  
     IsValidationCompleted = false;  
     lbStatusMessage.Text = "";  
  }  

7. Add a new class named serviceClient and implement your initial validation logic, basic data download, or what ever process that should be executed before the main UI is shown to the user. For the demonstration purpose, I will create some dummy methods as follows.

 public bool PingToService()  
 {  
   try  
   {  
      /* Create a client object and call a method in the service   
       * and return the value. You may implement the Ping method in   
       * the web/wcf service as follows.  
       * public bool Ping()  
       * {  
       *  return true;  
       * }  
       */  
      //------ For the Demonstration Purpose ------------------------  
        System.Threading.Thread.Sleep(1000);  
        return true;  
        //-------------------------------------------------------------    
   }  
   catch   
   {  
      /* If you want to handle the exception exactly one   
       * at a time implement as follows   
       * try{ .... }  
       * catch (ServiceException ex)  
       * {}  
       * catch (XYZException ex)  
       * {}  
       * catch(Exception ex)  
       * {}  
      */  
      return false;  
   }  
 }

 public bool CheckDataBaseConnectivity()  
 {  
    //------ For the Demonstration Purpose ------------------------  
     System.Threading.Thread.Sleep(1000);  
     return true;  
    //-------------------------------------------------------------    
 }

 public bool DownloadSomeData()  
 {  
     //----- For the Demonstration Purpose ------------------------  
     System.Threading.Thread.Sleep(1000);  
     return true;  
     //------------------------------------------------------------    
 }   
  
8. Now implement a method called InitialValidation inside the Splash.cs file and call the validation methods implemented in the above step as follows
 private void InitialValidation()  
 {  
   try  
   {  
      // Invoke an UI update through a delegate  
       this.Invoke((MethodInvoker)delegate  
       {  
          lbStatusMessage.Text = " Connecting ....";  
          progressBar1.Value = 10;  
       });  
       ServiceClient oServiceClient = new ServiceClient();  
       if (oServiceClient.PingToService())  
       {  
          this.Invoke((MethodInvoker)delegate  
          {   
             lbStatusMessage.Text = "Service Connectivity is OK ....";  
             progressBar1.Value = 20;  
          });  
          if (oServiceClient.CheckDataBaseConnectivity())  
          {  
             this.Invoke((MethodInvoker)delegate  
             {  
                 lbStatusMessage.Text = "DB Connectivity is OK ...";  
                 progressBar1.Value = 50;  
             });  
          }   
          if (oServiceClient.DownloadSomeData())  
          {  
             this.Invoke((MethodInvoker)delegate  
             {  
                lbStatusMessage.Text = "Configuration has applied ....";  
                progressBar1.Value = 70;  
             });  
          }  
          this.Invoke((MethodInvoker)delegate  
          {  
              lbStatusMessage.Text = "Finalizing ....";  
              progressBar1.Value = 90;  
          });  
          //---------- For the Demonstration Purpose ------------------------  
          System.Threading.Thread.Sleep(1000);  
          //----------------------------------------------------------------  
         this.Invoke((MethodInvoker)delegate  
         {  
           lbStatusMessage.Text = "";  
           progressBar1.Value = 100;  
         });  
      }  
      IsValidationCompleted = true;  
      // Invoke UI update  
      this.Invoke((MethodInvoker)delegate  
      {  
         this.Dispose();  
      });  
    }  
    catch (Exception Ex)  
    {  
      MessageBox.Show(Ex.Message, "Stop", MessageBoxButtons.OK, MessageBoxIcon.Error);  
      IsValidationCompleted = false;  
      Application.Exit();  
     }
 }

Make sure you assign the correct value for the variable IsValidationCompleted at the end of this method.

9. Then go to the design view of the Splash screen window, and double-click on an empty area to generate the Load event. Place the following code inside the form load event.
 System.Threading.Thread thread = new System.Threading.Thread(  
                      () => InitialValidation());  
 thread.Start();  

10. Now, if you run your project, and must see the splash screen with an incrementally increasing progress bar. Once it reaches 100 splash screen will be closed and the focus to the Visual Studio, Now you can prompt the login screen, to do that place the following code inside the program.cs file and call your login screen 
 if (frmSplash.IsValidationCompleted)  
  {  
   //-------- Show the Login Screen -------------  
  }  


Tuesday, March 5, 2013

Think in Reverse (Class Diagrams) - Composition,Aggregation & Association

If you are looking for something simple to understand the difference between association, aggregation, and composition, Then this article will be useful to you.

There are three primary inter-object relationships: association, aggregation, and composition. Using the correct relationship is important for placing implicit restrictions on the visibility and propagation of changes to the related classes, matters which play a major role in reducing system complexity.

Association :
A person and a company are two individual entities, but a person can work in a company, and he is called an employee... So the employee has an existence in the outer world as a person. So even if the company perishes, but the person will not perish.

 public class Example {  
   public static void main(String[] args) {  
     Person p1 = new Person("Vishal");  
     Company abc = new Company(p1);  
   }  
 }  
 class Person{  
   String name;  
   public Person(String name) {  
     this.name = name;  
   }  
 }  
 class Company{  
   Person employee;  
   public Company(Person p1) {  
     employee = p1;  
   }  
 }  

Composition (Non-Shared Association):
 public Class Client  
 {  
   BankAccount acc = new BankAccount();  
   public void addMoneyToBankAccount(decimal amount)  
   {       
     acc.AddMoney(amount);  
   }  
   public decimal CheckBalance()  
   {  
     return acc.CheckAccountBalance();  
   }  
 }  

** Points to notice: Client class has defined the BankAccount attribute (acc) as a class variable and initialized at the point of declaration. If I simply say, BankAccount is a part-of Client.   If inheritance gives us 'is-a' and composition gives us 'part-of', we could argue that aggregation gives us a 'has-a' relationship.

Aggregation (Shared Association): 
 Class Client  
 {  
   BankAccount acc;  
   public Client(BankAccount p_acc)  
   {  
    acc=p_acc;  
   }  
   public decimal CheckBalance()  
   {  
     return acc.CheckAccountBalance();  
   }  
 }  

Within aggregation, the lifetime of the part is not managed by the whole. The client class is only keeping a reference for BankAccount class, but is not controlling its object lifetime.

Even after the client object is destroyed, BankAccount object used within can be assigned for another Client.

Office Development : How to make an Excel cell read only

*** Please note that this article describes how to lock an Excel cell from code in Excel Add-in/Template/ Workbook type Visual Studio projects. If you want to make an Excel cell read only from within your application, please check the comments.

In order to lock the cells for a given range, first set the Locked property for that range to true and then protect that particular sheet. This will lock the cells from being edited. The following sample code will lock the cell range from A1 to C3 from editing.
this.Application.Cells.Locked = false;
this.Application.get_Range("A1", "C3").Locked = true;
Excel.Worksheet Sheet1 = (Excel.Worksheet)this.Application.ActiveSheet;
Sheet1.Protect(missing, missing, missing, missing, missing, missing, missing 
        missing, missing, missing, missing, missing, missing, missing,                            missing, missing);

References :
http://social.msdn.microsoft.com/Forums/en/vsto/thread/f89fe6b3-68c0-4a98-9522-953cc5befb34
http://social.msdn.microsoft.com/Forums/en-US/vsto/thread/583f39a1-c3e2-4aaf-8c85-caacb6dbfa94

Tuesday, February 12, 2013

Creating a Simple SQL Database Wrapper using C#

Intended Audience: Absolute beginners
Prerequisite: Microsoft Visual Studio, Microsoft SQL Server (Any version)

If you are a novice to C# programming (like I was), and if you are asked to write a small program as an assignment of your course module by connecting to a Ms-SQL database, this article might help you to solve thousands of your questions.

I'm writing this sample in a very simple manner to make it more understandable, Even when I started programming, the practice that I used was to design the form (UI-User Interface) and then think about the backend development (not even knowing about the 3-tier architecture). So what I did was double click on the button, create a SqlConnection and a SqlCommand, assign appropriate values, and if I want to read data from the database executed to a SqlDataReader or filled to a dataset through SqlDataAdaptor. So for each place I had to duplicate the same coding, which is not a good practice. So My friend told me to write a simple wrapper class and use an object from that class in each place that I called the database operations.

This is how I have done it in the year 2007,
I broke the solution into two projects, UI in a standard windows application (of course you can use WPF application or ASP.Net) and the database wrapper as a separate class library (.dll) project.

If you have a doubt about naming your projects, just try to practice the following naming convention.
Say if your project title is  "My First Project" then name your solution as it is. (See the below images) and when naming the projects in the Visual Studio always start with  MFP.SomeName.

Ok let's go for a hands-on self exercise.
  1. Open Visual Studio 2012, (or any version you have)
  2. Go to File Ã  New  Ã  Project  

3. Locate Other Project Types, If you are using VS2010/2008 or 2005 there won't be a note called Templates, other project types appear as the root node. Select Visual Studio Solutions, then select Blank Solution. Put your project name in the Name text box. In the project location, you can change your solution folder,. Finally, click OK.

4. Then locate the solution explorer sliding toolbar, usually in the right corner, if not left.
    Right-click on the Solution Ã  New  Ã  New Project


5. Select Class Library (right side) from Visual C# node (left side). Type the project name as follows,
<shorten the name of the solution>.<component/layer/tier name> and click OK

Ex. MFP.DataLayer 


6. Now rename the Class1.cs as DBWrapper.cs by  Right click on Class1.cs Ã  Rename  Ã  Type "DBWrapper".


7. The best practice is to remove all the non-used namespaces from the code. The advantage you get in here is a quick response from Visual Studio IntelliSense ( listing down the matching key words into a list box while you are typing)  and fewer collisions due to the same class name within different namespaces. So first remove all unused namespaces from the code by ;
    Click on any using statement Ã  Organize Using  Ã  Remove Unused Usings


if you don't have any idea why these using statements are placed at the top of the code, please read
this post.

Once you remove unused Usings statement, all the using statements will be removed, now include System namespace, and following two name spaces.
System.Data  Ã  Since we are using built in DataSet class objects
System.Data.SqlClient  Ã  Since we are using SqlConnection,...etc class objects

 using System;  
 using System.Data;  
 using System.Data.SqlClient;  
 namespace MFP.DataLayer  
 {  
   public class DBWrapper  
   {  
   }  
 }  

8. Let's declare our class variables needed for the database wrapper class.

 using System;  
 using System.Data;  
 using System.Data.SqlClient;  
 namespace MFP.DataLayer  
 {  
   public class DBWrapper  
   {  
     private SqlConnection oSqlCon;  
     private SqlCommand oSqlCom;  
     private SqlDataAdapter oSqlDtAdptr;  
     private SqlDataReader oSqlDtRdr;  
     private SqlConnectionStringBuilder oConStringBuilder;  
   }  
 }  

9. Basically, you can connect to a SQL Server using two authentication methods.
  1. SqlServer Authentication
  2. Windows Authentication
      Read this article to grab more knowledge: Choosing an Authentication Mode - MSDN

So I'm going to implement multiple class constructors as follows,
Constructor 1 : Accepts SQL server instance name, and the database name
Constructor 2 : Accepts SQL server instance name, database name, database login username, database login password

 using System;  
 using System.Data;  
 using System.Data.SqlClient;  
 namespace MFP.DataLayer  
 {  
   public class DBWrapper  
   {  
     private SqlConnection oSqlCon;  
     private SqlCommand oSqlCom;  
     private SqlDataAdapter oSqlDtAdptr;  
     private SqlDataReader oSqlDtRdr;  
     private SqlConnectionStringBuilder oConStringBuilder;  
     public DBWrapper(string sqlInstanceName,string dbName)  
     {  
       // Constructor 1  
     }  
     public DBWrapper(string sqlInstanceName,string dbName, string dbUserName,string dbPass)  
     {  
       // Constructor 2  
     }  
   }  
 }  

10. Now fill the constructor 1 as follows.
 public DBWrapper(string sqlInstanceName,string dbName)  
 {  
   oConStringBuilder = new SqlConnectionStringBuilder();  
   oConStringBuilder.DataSource = sqlInstanceName;  
   oConStringBuilder.InitialCatalog = dbName;  
   // since you are not giving the sql user name password, you must   
   // enable integrated security  
   oConStringBuilder.IntegratedSecurity = true;  
   // create an object from the SqlConnectionClass  
   oSqlCon = new SqlConnection();  
   // set the connection string from SqlCommandBuilder object  
   oSqlCon.ConnectionString = oConStringBuilder.ConnectionString;  
 }  

And constructor 2 as follows.
 public DBWrapper(string SqlServerInstanceName, string DataBaseName, string DbUserName,string DbPassword)   
 {   
   oConStringBuilder = new SqlConnectionStringBuilder();  
   oConStringBuilder.DataSource = SqlServerInstanceName;  
   oConStringBuilder.InitialCatalog = DataBaseName;      
   oConStringBuilder.UserID = DbUserName;    
   oConStringBuilder.Password = DbPassword;   
   //since you are giving the sql user name password, its optional to  
   // disable integrated security   
   // oConStringBuilder.IntegratedSecurity = false;   
   // create an object from the SqlConnectionClass   
   oSqlCon = new SqlConnection();   
   // set the connection string from SqlCommandBuilder object     
   oSqlCon.ConnectionString = ConStringBuilder.ConnectionString;   
 }  

It's not mandatory to use the ConnectionStringBuilder object, you can even directly assign the connection string to the oSqlCon.ConnectionString="Data Source = .....". Hardcoded configurations are not technically accepted at the industry. So better to place the connection string in your app.config file and map it here.


11. Let's create one method for Insert, Update and Delete.
 public int InsertUpdateDelete(string SqlCommandAsString)  
     {  
       try  
       {  
         // check whether the connection is not open  
         if (oSqlCon.State != ConnectionState.Open)  
         {  
           oSqlCon.Open();  
         }  
         using (oSqlCom = new SqlCommand())  
         {  
           // set the connection for the commnad  
            oSqlCom.Connection = oSqlCon;  
           // assign the insert query as a text to the sql command  
           oSqlCom.CommandText = SqlCommandAsString;  
           // this will return no of rows affected, by executing the query  
           return oSqlCom.ExecuteNonQuery();  
         }  
       }  
       catch(Exception Ex)  
       {  
         throw Ex;  
       }  
       finally  
       {  
         if (oSqlCon.State == ConnectionState.Open)  
         {  
           oSqlCon.Close();  
         }  
       }  
     }  

When you execute this code, you can verify whether data has been actually saved to the database i.e. any records in db have changed by examining the returned value from this. If you try to insert one record return value must be 1, if it is an update statement and if it has altered (n) no of records in the database, the return value should be n.

12. Next, write a method to take data out of the database. At this moment, I'll explain it using datasets.
The advantage of using the data set is, it will make it easier for you to bind the data into the controllers i.e data grids, combo boxes etc.

Place the following code segment below to the  InsertUpdateDelete method.
 public DataSet FillDataSet(string SqlSelectCommandAsString)  
     {  
       try  
       {  
         // check whether the connection is not open  
         if (oSqlCon.State != ConnectionState.Open)  
         {  
           oSqlCon.Open();  
         }  
         DataSet ds = new DataSet();  
         using (oSqlCom = new SqlCommand())  
         {  
           // set the connection for the commnad  
           oSqlCom.Connection = oSqlCon;  
           // assign the insert query as a text to the sql command  
           oSqlCom.CommandText = SqlSelectCommandAsString;  
           using (oSqlDtAdptr = new SqlDataAdapter())  
           {  
             oSqlDtAdptr.SelectCommand = oSqlCom;  
             oSqlDtAdptr.Fill(ds);  
             return ds;  
           }  
         }  
       }  
       catch (Exception Ex)  
       {  
         throw Ex;  
       }  
       finally  
       {  
         if (oSqlCon.State == ConnectionState.Open)  
         {  
           oSqlCon.Close();  
         }  
       }  
     }  
13. So this very basic DB Wrapper class is now capable of performing all basic database operations, (Create, Read, Update & Delete). We usually use the term CRUD for these standard operations.

Now, your full class should look like this,

1:  using System;  
2:  using System.Data;  
3:  using System.Data.SqlClient;  
4:  namespace MFP.DataLayer  
5:  {  
6:    public class DBWrapper  
7:    {  
8:      private SqlConnection oSqlCon;  
9:      private SqlCommand oSqlCom;  
10:      private SqlDataAdapter oSqlDtAdptr;  
11:      private SqlDataReader oSqlDtRdr;  
12:      private SqlConnectionStringBuilder oConStringBuilder;  
13:      public DBWrapper(string SqlServerInstanceName,string DataBaseName)  
14:      {  
15:        oConStringBuilder = new SqlConnectionStringBuilder();  
16:        oConStringBuilder.DataSource = SqlServerInstanceName;  
17:        oConStringBuilder.InitialCatalog = DataBaseName;  
18:        // since you are not giving the sql user name password, you must enable integrated security  
19:        oConStringBuilder.IntegratedSecurity = true;  
20:        // create an object from the SqlConnectionClass  
21:        oSqlCon = new SqlConnection();  
22:        // set the connection string from SqlCommandBuilder object  
23:        oSqlCon.ConnectionString = oConStringBuilder.ConnectionString;  
24:      }  
25:      public DBWrapper(string SqlServerInstanceName, string DataBaseName, string DbUserName,string DbPassword)  
26:      {  
27:        oConStringBuilder = new SqlConnectionStringBuilder();  
28:        oConStringBuilder.DataSource = SqlServerInstanceName;  
29:        oConStringBuilder.InitialCatalog = DataBaseName;  
30:        oConStringBuilder.UserID = DbUserName;  
31:        oConStringBuilder.Password = DbPassword;  
32:        // since you are giving the sql user name password, its optional to disable integrated security  
33:        // oConStringBuilder.IntegratedSecurity = false;  
34:        // create an object from the SqlConnectionClass  
35:        oSqlCon = new SqlConnection();  
36:        // set the connection string from SqlCommandBuilder object  
37:        oSqlCon.ConnectionString = oConStringBuilder.ConnectionString;  
38:      }  
39:      public int InsertUpdateDelete(string SqlCommandAsString)  
40:      {  
41:        try  
42:        {  
43:          // check whether the connection is not open  
44:          if (oSqlCon.State != ConnectionState.Open)  
45:          {  
46:            oSqlCon.Open();  
47:          }  
48:          using (oSqlCom = new SqlCommand())  
49:          {  
50:            // set the connection for the commnad  
51:            oSqlCom.Connection = oSqlCon;  
52:            // assign the insert query as a text to the sql command  
53:            oSqlCom.CommandText = SqlCommandAsString;  
54:            return oSqlCom.ExecuteNonQuery();  
55:          }  
56:        }  
57:        catch(Exception Ex)  
58:        {  
59:          throw Ex;  
60:        }  
61:        finally  
62:        {  
63:          if (oSqlCon.State == ConnectionState.Open)  
64:          {  
65:            oSqlCon.Close();  
66:          }  
67:        }  
68:      }  
69:      public DataSet FillDataSet(string SqlSelectCommandAsString)  
70:      {  
71:        try  
72:        {  
73:          // check whether the connection is not open  
74:          if (oSqlCon.State != ConnectionState.Open)  
75:          {  
76:            oSqlCon.Open();  
77:          }  
78:          DataSet ds = new DataSet();  
79:          using (oSqlCom = new SqlCommand())  
80:          {  
81:            // set the connection for the commnad  
82:            oSqlCom.Connection = oSqlCon;  
83:            // assign the insert query as a text to the sql command  
84:            oSqlCom.CommandText = SqlSelectCommandAsString;  
85:            using (oSqlDtAdptr = new SqlDataAdapter())  
86:            {  
87:              oSqlDtAdptr.SelectCommand = oSqlCom;  
88:              oSqlDtAdptr.Fill(ds);  
89:              return ds;  
90:            }  
91:          }  
92:        }  
93:        catch (Exception Ex)  
94:        {  
95:          throw Ex;  
96:        }  
97:        finally  
98:        {  
99:          if (oSqlCon.State == ConnectionState.Open)  
100:          {  
101:            oSqlCon.Close();  
102:          }  
103:        }  
104:      }  
105:    }  
106:  }  

Let's create a sample UI.
1. Right-click on the Solution and get the add new project dialogue as you did above.

2. Design the form as below

3. Add the reference of your database wrapper project to the UI project as follows.


then tick the DataLayer project as follows, and click OK.

4. Now double-click on the View All Button in the form designer.
   Replace all the using statements from the following
              using System;
              using System.Windows.Forms;
              using MFP.DataLayer;


Note : We have added the project reference, and now we have listed it at the top, so now we should be able to use the DBWrapper class as it's in the same project.

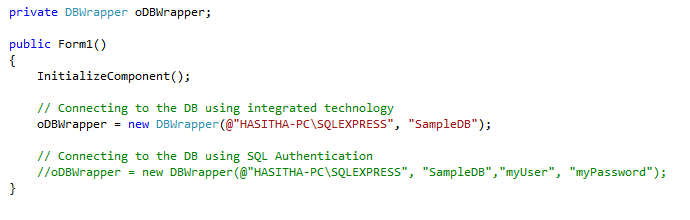
5. Now create an object from the DBWrapper Class as follows


6. Let's show all the students in the database on the data grid. We call this as data binding, in simple words setting the data source to a collection type i.e dataset or an array of objects.
Double-click on the "Read All" button and type the following code.
Note : This is not a good practice to pass the queries from the UI, but this is just for the demonstration without making things complicated.


C# Calling a Parameterised DB2 SP Failed to Return Records


If you are facing this problem while you are trying to connect to the DB2 via  IBM iSeries driver, make sure that you are parsing the  iDB2Parameter in the correct order as specified in the stored procedure.

Ex.
-- DB2 SP
CREATE PROCEDURE SOMESCHEMA.SOME_SP(
IN SOME_PAR1 VARCHAR(100) ,
IN SOME_PAR2 VARCHAR(100) ,
IN SOME_PAR3 INTEGER)
.......
....
..

// C# code block that calls the SP

 // Create command initiates the iDB2Command and set the 
 // iDBConnection
 using (iDB2Command command = CreateCommand())  
 {
     // GetProcedure() will return the name of the SP as a string
     command.CommandText = GetProcedure(); 
     command.CommandType = CommandType.StoredProcedure;

    // Note these three lines, Parameters are not given in to the  
    // specific order of the SP
     command.Parameters.AddWithValue("@SOME_PAR3", SomeValue);
     command.Parameters.AddWithValue("@SOME_PAR1", SomeValue);
     command.Parameters.AddWithValue("@SOME_PAR2", SomeValue);

     using (iDB2DataReader dataReader = command.ExecuteReader())
     {
        while (dataReader.Read())
        {
           // You breakpoint will never hit inside to this block
        }
     }
}


So make sure you pass the iDB2Parameters in the same order as specified inside the SP.

       command.Parameters.AddWithValue("@SOME_PAR1", SomeValue);
       command.Parameters.AddWithValue("@SOME_PAR2", SomeValue);
       command.Parameters.AddWithValue("@SOME_PAR3", SomeValue);

I have a doubt whether iSeries driver doesn't care about the name you have given as the parameter name, i.e specify as parameter 1 and pass the value of parameter 2. But it's clear that iDB2Command expects the SP parameters in the exact order as specified in the stored procedure.


Hello World !!


Do you remember the first ever programming example that you had tried out, or you have been taught? That's it.... Hope you got it by now, But if not... you should be from a non 1s and 0s background.  "Hello World!" is the first sample program that is usually explained in any computer language.

Since this is the first time that I am writing a blog, I thought of telling you how to write the "Hello World" program in different languages according to the order I've learned.

C :
#include <stdio.h>                                                                            
//This is needed to be included to use the 'printf()'
int main(void)
{
    printf("Hello World!\n");
    return 0; // Notice the main method has a return type and its int

}

C++

#include <iostream.h>

int main()
{
    cout<<"Hello World"<<endl;                                                              //This prints "Hello World" and <<endl makes a new line
    return 0; 
}

VB
' Allow easy reference to the System namespace classes.
Imports System

' This module houses the application's entry point.
Public Module Modmain
   ' Main is the application's entry point.
   Sub Main()
     Console.WriteLine ("Hello World")                                                       ' Write text to the console.
   End Sub
End Module

C#
using System;
class Hello 
{
   static void Main() 
   {
      Console.WriteLine("Hello World");
   }
}

Java
public class HelloWorld {
    public static void main(String[] args) {
        System.out.println("Hello World");
      }
}

All the "Hello Worlds" seem similar to me. How about you? But when you become familiar with one language for a long time you will tend to believe that the languages are completely different, yes of course they do from the technological point of view, but not from the foundation concepts.  

Most of my teenage life was spent with programming, fulfilling my learning thirst every day. 

So this is going to be a beginning of a long journey. I hope my visionary statements could guide me there.


1) Always seek a change, and if the change does not come to you, be the change you want to see around you.

2). Never satisfied with your current status, always improve it by revisiting what you have missed