Saturday, December 12, 2015

ASP.NET MVC - Find Absolute Path to the App_Data folder from Controller


Let's look at a few ways to find the absolute path to the App_Data folder from a Controller in an ASP.NET MVC project

ASP.NET MVC1 to MVC3
string path = HttpContext.Current.Server.MapPath("~/App_Data/myData.xml");

 ASP.NET MVC4
string path = HttpContext.Server.MapPath("~/App_Data/myData.xml");
MSDN Reference: HttpServerUtility.MapPath Method

If you put this code inside a controller, you might encounter with the below compilation error.


An object reference is required for the non-static field, method, or property 'System.Web.Mvc.Controller.HttpContext.get'

Your base class Controller already implements a property HttpContext. So you must reference it as fully qualified: System.Web.HttpContext.Current.Server.MapPath("..")

ASP.NET (WebForms)
string path = AppDomain.CurrentDomain.GetData("DataDirectory").ToString();


Differences Between ViewResult() and ActionResult()

Let's look at the difference between ViewResult() and ActionResult() in ASP.NET MVC.

public ViewResult Index()
{
    return View();
}

public ActionResult Index()
{
    return View();
}
ActionResult() is a general result type that can have several subtypes (Ref:ASP.NET MVC 1.0 Quickly" Book)

a) ViewResult : Renders a specified view to the response stream
b) PartialViewResult : Renders a specified partial view to the response stream
c) EmptyResult : Basically does nothing; an empty response is given
d) RedirectResult : Performs an HTTP redirection to a specified URL
e) RedirectToRouteResult : Performs an HTTP redirection to a URL that is determined  by the routing engine, based on given route data
f) JsonResult : Serializes a given ViewData object to JSON format
g) JavaScriptResult : Returns a piece of JavaScript code that can be executed on
the client
h) ContentResult : Writes content to the response stream without requiring  a view
i) FileContentResult : Returns a file to the client
j) FileStreamResult : Returns a file to the client, which is provided by a Stream
k) FilePathResult : Returns a file to the client

In MVC framework, it uses ActionResult class to reference the object your action method returns. And invokes ExecuteResult method on it. ViewResult is an implementation for this abstract class. It will try to find a view page (usually aspx page) in some predefined paths( /views/controllername/, /views/shared/, etc) by the given view name.

It's usually a good practice to have your method return a more specific class. So if you are sure that your action method will return some view page, you can use ViewResult. But if your action method may have different behaviour, like either rendering a view or performing a redirection. You can use the more general base class ActionResult as the return type.

(Ref::http://forums.asp.net/)

Wednesday, December 9, 2015

Install Oracle Database Express Editions

Similar to Ms-SQL sever express editions (a scaled-down version of the big Cat), Oracle also provides express editions (XE). You can check out the latest XE version below URL.

http://www.oracle.com/technetwork/database/database-technologies/express-edition/overview/index.html

(Ref:http://www.oracle.com/)

Oracle Database XE is a great starter database for:

  • Developers working on Node.js, Python, PHP, Java, .NET, XML, and Open Source applications
  • DBAs who need a free, starter database for training and deployment
  • Independent Software Vendors (ISVs) and hardware vendors who want a starter database to distribute free of charge
  • Educational institutions and students who need a free database for their curriculum
With Oracle Database XE, you can now develop and deploy applications with a powerful, proven, industry-leading infrastructure, and then upgrade when necessary without costly and complex migrations.

Restrictions :
Oracle Database XE can be installed on any size host machine with any number of CPUs (one database per machine), but XE will store up to 11GB of user data, use up to 1GB of memory, and use one CPU on the host machine.


Friday, December 4, 2015

Microsoft BizTalk Server 2006 Configuration

After Installing the Biz Talk server 2006, you must configure it before starting any development. If you have started, you might have encountered the below error when publishing the solution or when selecting the deployment server.


<No BizTalk Configuration database(s) found on server '(LOCAL)'.>

This confirms that the issue is with user access to the database, not with the connection/network issue. If you have already configured the Biz Talk server 2006, You can check the BizTalk admin group in the SQL server where BizTalkMgmtDb exists. In my case, I haven't configured the BTS.

Go to Start à All Programs à Microsoft BizTalk Server 2006 à BizTalk Server Configuration

Note :: You must run the application with Administrative privileges. (Right-click and select run as Administrator)


 You can progress ahead with either Basic Configuration or Custom Configuration. The only point that you have to consider is if the database server is in another server (i.e. not localhost) and the Biz Talk instance have configured before, you have to select the "Custom configuration" option.

Provide NT AUTHORITY\NETWORK SERVICE as the username and click on Configure.


Let's enable all the features.

1. Enterprise Single Sign-On (SSO)


If you are getting the below error on Data Stores,
failed to connect to the sql database ssodb on sql server

Do the below described steps to create the SSO database.

1. Start the Visual Studio command prompt as an Administrator (must)
2. Go to the C:\Program Files\Common Files\Enterprise Single Sign-On directory
3. Run regasm ssosql.dll command
4. Deselect "Enable Enterprise Single Sign-On this computer" and select it again.


Now If you are still getting the below error on Windows Service,
failed to connect to the sql database ssodb on sql server

Do the below-described steps to configure SSO.

Go to Start à All Programs à Microsoft Enterprise Single Sign-On à SSO Administration (run it as an Administrator)


Select the SSO server name and tick Set SSO Server for all users, and click OK.


Expand Enterprise Single Sign-On and click on "Create Database"


For security reasons, inbuilt Administrator accounts are not allowed to add. 

(To be continued... )

Thursday, December 3, 2015

Install BizTalk Server 2006

New Start, First let's check for the prerequisites.
  • Microsoft Windows Server 2003 with Service Pack 1
  • IIS 6.0
  • Office Excel 2003 and InfoPath 2003 with service pack 2
  • Visual Studio 2005
  • SQL Server 2005
  • Windows Sharepoint Services 2.0 with Service Pack 3
Some of the other required components are available in here.

The detailed installation guide is located in the 'Installation Guide.html' file inside your installation folder.


Progress with Installation by clicking on "Install". Provide your name and the name of your organization, and on next screen accept the license agreement.


Select what you want to install from the Component Installation wizard step.


The below descriptions have been extracted from the Description box.

> Documentation (46.17 MB):
Selecting the Documentation component installs the core documentation, tutorials, UI reference (F1 help), programmer's reference, and usage instructions for the SDK samples and utilities.

Required components :
+ Microsoft Document Explorer 2005

> Server Run-time (172.84 MB) :
Installs the run-time services for Biz Talk Server 2006. These run-time services are an essential part of the Biz Talk Server platform.

Required components :
+ Enterprise Single Sign-On (SSO) Administration
+ Enterprise Single Sign-On (SSO) Server
+ Microsoft SQL XML 3.0 Service Pack 3
+ Enterprise Single Sign-On Administration
+ Enterprise Single Sign-On Server
+ Microsoft ADO MD.Net 8.0
+ Microsoft ADO MD.Net 8.0 Patch
+ Microsoft ADO MD.Net 9.0

+ Base EDI Adapter (126.58 MB) 
Installs the necessary software that enables Biz Talk Server 2006 to process documents in the Electronic Data Interchange (EDI) format.

> Portal Components (36.32 MB):
Includes set of services used by business people to communicate, collaborate, and reach decisions enabling them to interact, configure, and monitor business processes and workflows.
Required components :
+ Internet Information Services (IIS)
+ Microsoft SQL XML 3.0 Service Pack 3

+ Business Activity Services :
Installs the necessary software that enables information workers to collaborate and manage business processes and trading partners.

Required components :
+ Single Sign-On (SSO) Administration
+ Internet Information Services (IIS) and Windows Sharepoint Services of the same language or language pack as the BizTalk installation

Note : If you have Commerce Server 2002 installed on the system, you must uninstall it or upgrade to Commerce Server 2006 first.

+ Business Activity Monitoring  (17.51 MB):
Installs the necessary software that gives business users a real-time view of their heterogeneous business processes, enabling them to make important business decisions.

Required components :
+ Internet Information Services (IIS)

+ Human Workflow Web Service
This service enables clients to dynamically compose workflow, receive workflow guidance and obtain the latest state of the workflow activities.

Required components :
> Internet Information Services (IIS)

Size of this feature: 4.42 MB

> Administration Tools (51.63 MB):
Installs the necessary software to administer BizTalk Server 2006.

Required components :
+ Enterprise Single Sign-On (SSO) Administration
+ Microsoft ADO MD.Net 9.0 Enterprise Single Sign-On Administration
+ Microsoft SQL XML 3.0 Service Pack 3
+ Microsoft ADO MD.Net 8.0
+ Microsoft ADO MD.Net 8.0 Patch

> Developer Tools and SDK
Developer Tools and SDK component installs samples and utilities that enable the rapid creation of BizTalk Server 2006 solutions. This includes: SDK samples and supporting documentation, BizTalk Explorer, schema and map designers, and Visual Studio .NET project templates.

Required components :
+ Visual Studio .NET 2005.
+ Enterprise Single Sign-On (SSO) Administration.

On the next screen, leave the automatically install redistributable prerequisites from the web.


Click on Install to begin the installation.


Export Query Results from SQL Server Management Studio

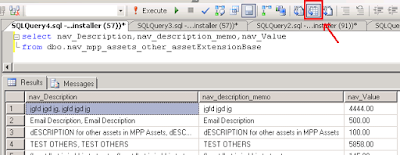
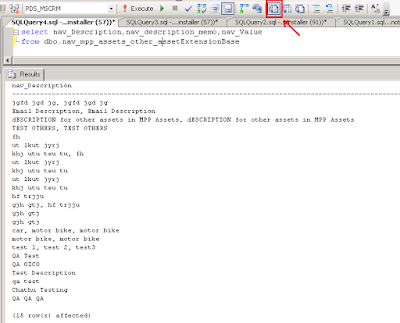
SQL Server Management Studio provides three different ways to see the results of your query.

1. Results to grid :


When you click on "Execute", results will be shown on the Results Grid (default behaviour)

2. Results to File :


Switch to this mode by clicking on the  "Results to File" icon. When you click on execute, save results dialogue will appear, and you can save the results as a report file (.rpt).

3. Result to Text :


Switch to this mode by clicking on the  "Results to Text" icon. When you click on execute, results will be displayed on the "Results" tab.


Wednesday, May 27, 2015

How to query last restore date of each data base in SQL Server

Below query shows the last database restore point information.

WITH LastRestores AS
(
SELECT
    DatabaseName = [d].[name],
    [d].[create_date] ,
    [d].[compatibility_level],
    [d].[collation_name] ,
    r.*,
    RowNum = ROW_NUMBER() OVER (PARTITION BY d.Name ORDER BY r.[restore_date] DESC)
FROM master.sys.databases d
LEFT OUTER JOIN msdb.dbo.[restorehistory] r ON r.[destination_database_name] = d.Name
)
SELECT *
FROM [LastRestores]
WHERE [RowNum] = 1

Saturday, February 14, 2015

Connect Visual Studio with Visual Studio Online

From this post, I'll share step by step procedure that you need to follow to get connected with your online TFS account i.e. Visual Studio account

If you need to know more about Visual Studio Online, below URL will be informative for you.
http://www.visualstudio.com/en-us/products/what-is-visual-studio-online-vs.aspx

If you have not yet owned or created a Visual Studio online account, check my previous blog post to get an idea.

First let's take a look at the reverse way.

1. Open up Vs 2013 and Navigate to Team --> Connect to Team Foundation Server....


2. Click on Select Team Projects. "Connect to Team Foundation Server" dialog will appear. Then click on Servers and then on Add to add your online visual studio account url.


3. Add your visual studio online url as below and click OK.


4. You will be prompted to enter your Microsoft account credentials. Once authenticated, you will get a list of team projects which you have access.


5. Click on connect to get connected with your team project. Once this is setup |Team Explorer" side panel will pop-out as below.


Now the easiest one step way. Once you log into the Visual Studio Online account and navigate to the team project, you can easily open-up your team project with visual studio  2013 .


Sunday, January 25, 2015

Install & Configure Sonar with TFS 2012


This article demonstrates how to configure Sonar with TFS 2012 in Microsoft Windows Server 2008R2 environment with Microsoft SQL Server 2008R2 as the sonar database.

I've skipped the TFS installation and configuration part. You must have a configured TFS 2012 installation, before configuring sonar.


SonarQube Platform Overview
The SonarQube platform is made of 3 components:

1. A database to store:
The configuration of the SonarQube instance (security, plugins settings, etc.)
The quality snapshots of projects, views, etc.
2. A Web Server for users to browse quality snapshots and configure the SonarQube instance
3. One or more Analysers to analyze projects


Configure the Database

1. Open up the SQL Management Studio and create a new login as below.
login name : sonar
password : sonar


2. Create a new database : Database name : "sonar"
3. Create the database user and tick all the permissions


** points noted from sonar documentation:
Note that collation must be case-sensitive (CS) and accent-sensitive (AS).
Install and Configure the Web Server

1. Download and install the latest SonarQube version from here.
2. Create a folder on a disk partition that has a reasonable amount of free space and rename it as "Sonar". Inside of that, create another and rename it to "SonarQube".
3. Extract the downloaded SonarQube binaries inside the "SonarQube" folder.
4. Edit the below file and apply the below configurations.

X:\Sonar\SonarQube\conf\sonar.properties


- Apply the username and the password that was given when you create the sql user.
- Alter the Ms-SQL configuration string as below

#----- Microsoft SQLServer
# The Jtds open source driver is available in extensions/jdbc-driver/mssql. More details on http://jtds.sourceforge.net
# The validation query is optional.
sonar.jdbc.url: jdbc:jtds:sqlserver://<database server>;databaseName=SONAR;instanceName=<database instance>;selectMethod=cursor;
sonar.jdbc.driverClassName: com.microsoft.sqlserver.jdbc.SQLServerDriver
sonar.jdbc.validationQuery: select 1
sonar.jdbc.dialect= mssql

5. Now move to the below folder and create a new folder called "mssql" if it does not already exist.
6. Download Microsoft SQL JDBC Driver and extract the sqljdbc4.jar file to mssql folder.
7. Execute the StartSonar.bat from either x:\Sonar\SonarQube\bin\Windows-x64-64 or Windows-x64-32 depending on your configuration.
8. Then open up a command prompt as run as Administrator and execute InstallNTService.bat located in the folder used in step 7.


9. Restart your PC, and then navigate to http://localhost:9000 (from inside the installed server)
Default Admin user name/password : Admin/Admin


10. Now download and extract the SonaQubeRunner from here and extract to the below folder:
x:\Sonar\SonarQube\sonar-runner-2.4\

11. Replace Ms-SQL section (with what you have used in the previous step)of the configuration file located in the conf folder.


12. Now create a system variable called "SONAR_RUNNER_HOME" and point it to the Sonar Runner folder.

13. Add Sonar-runner bin folder to the "Path" Environment Variable


14. Open-up a new console and type "sonar-runner", if perform some checks.. then you are still on the road.
15. Create a file "sonar-project.properties" add it to the root folder of your Visual Studio solution, and add it to TFS.


16. Add these lines to that file.


17. Another 2 installations are needed to be done.
C# Plugin | Analysis Bootstrapper for Visual Studio Projects Plugin

Copy both downloaded plugins to x:\Sonar\Sonar-runner-2.4\extensions\plugin\ and then restart the SonarQube server.

18. To analyze your C# project. Open up a common prompt and navigate to the folder where your sonar-runner property file is located in. Type sonar-runner and once the analysis is finished, open up the Sonar portal, and you will see a new project is listed.


19. Now the last step, include a post build script in your main project.

20. Final step, create a CI build definition and trigger it, and when the build success, check the  http://<your sonar installed server>:9000, and you will see the project. You can create custom dashboards with inbuilt widgets to get more insight into your code base.

A useful Visual Studio extension called VSSonarExtension can be used to analyse code against the sonar default rules. You can read more about the extension here.

Most of the stuff that I've summarized here were extracted from the below sites :
http://docs.sonarqube.org/display/SONAR/Installing
http://www.sezok.de/sonar/sonar.html